Welcome to the world of computer hacks and tricks! If you want to make the most of your computer and get things done faster, you're in the right place. These cool tricks are like shortcuts that can help you work smarter, not harder.
In this guide, we'll explore simple and legal techniques to boost your computer's performance, organize your files like a pro, and use handy shortcuts to save time. Whether you're a tech expert or just starting, these hacks will make your digital life easier and more efficient.
So, let's dive in and discover how to unlock the full potential of your computer for maximum efficiency! Here are some computer hacks and tricks you might find useful.
1. Keyboard shortcuts: Learn and use keyboard shortcuts to increase your productivity.
Keyboard shortcuts are combinations of keys or key sequences that perform specific actions or commands, allowing users to quickly access certain functions without using the mouse or navigating through menus.
For example, Ctrl+C to copy, Ctrl+V to paste, Ctrl+Z to undo, and Ctrl+S to save.
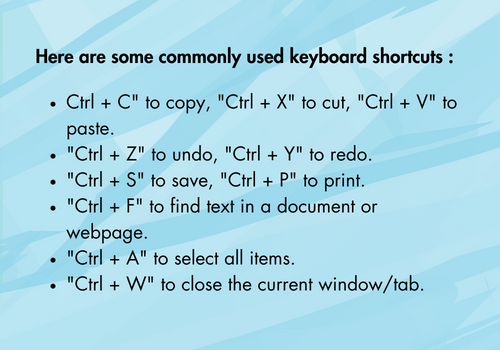
Here are some commonly used keyboard shortcuts :
- Ctrl + C: Copy selected text or item.
- Ctrl + X: Cut selected text or item.
- Ctrl + V: Paste copied or cut text or item.
- Ctrl + Z: Undo the last action.
- Ctrl + Y: Redo the last action.
- Ctrl + A: Select all text or items in a document or folder.
- Ctrl + S: Save the current document or file.
- Ctrl + P: Print the current document or file.
- Ctrl + F: Open the "Find" dialog box to search for text.
- Ctrl + N: Open a new document or window.
- Ctrl + O: Open an existing document or file.
- Ctrl + W: Close the current document or window.
- Ctrl + Tab: Switch between open tabs or documents.
- Ctrl + Shift + Esc: Open the Task Manager (Windows).
- Ctrl + Alt + Del: Open a menu with options to lock, switch user, sign out, or open the Task Manager (Windows).
- Ctrl + Shift + T: Reopen the last closed tab in a web browser.
- Ctrl + Shift + N: Open a new incognito/private browsing window in a web browser.
- Ctrl + Shift + P: Open a new private browsing window in a web browser.
- Ctrl + Home: Scroll to the top of a document or web page.
- Ctrl + End: Scroll to the bottom of a document or web page.
2. Snipping Tool (Windows) or Grab (Mac): Use these built-in tools to capture screenshots or specific areas of your screen quickly.
The Snipping Tool is a built-in screenshot utility available on Windows operating systems. It allows you to capture screenshots of all or part of your screen and save them as an image file.Here are some keyboard shortcuts specifically for the Snipping Tool:
1. Windows key + Shift + S: This shortcut opens the Snipping Tool in "Snip & Sketch" mode, which allows you to select and capture a specific region of the screen.
1. Windows key + Shift + S: This shortcut opens the Snipping Tool in "Snip & Sketch" mode, which allows you to select and capture a specific region of the screen.
2. After selecting the area, the screenshot is copied to the clipboard, and you can paste it into another application or save it as an image file.
3. Additionally, once you have opened the Snipping Tool, you can use the following shortcuts within the Snipping Tool application:
- Alt + M: Choose a different snipping mode (such as Free-form, Rectangular, Window, or Full-screen).
- Alt + N: Create a new snip.
- Ctrl + S: Save the current snip.
- Ctrl + C: Copy the current snip to the clipboard.
- Ctrl + E: Edit the current snip (opens the snip in the Snip & Sketch app for further editing).
- Ctrl + P: Print the current snip.
3. Multiple desktops: Take advantage of the multiple desktop feature available on Windows, Mac, and Linux. It allows you to organize your work and switch between different desktop spaces with ease.
Multiple desktops, also known as virtual desktops or virtual workspaces, are a feature available in many operating systems that allow users to create and switch between multiple independent desktop environments.
Each desktop can have its own set of open windows and applications, providing a way to organize and manage tasks more efficiently.
Here's how to work with multiple desktops on different operating systems:
Windows:
1. Create a new desktop: Press Windows key + Tab to open Task View. From there, click on "New Desktop" in the bottom right corner or use the shortcut Windows key + Ctrl + D.
2. Switch between desktops: Press Windows key + Tab to open Task View, and then click on the desired desktop. Alternatively, use the shortcut Windows key + Ctrl + Left Arrow/Right Arrow to cycle between desktops.
3. Move windows between desktops: Open Task View, right-click on the window you want to move, and select "Move to" followed by the target desktop. Alternatively, you can drag and drop the window's thumbnail from Task View onto the desired desktop.
macOS:
1. Create a new desktop: Press Mission Control key (usually F3) or swipe up with three or four fingers on the trackpad to enter Mission Control. Then click on the "+" button in the top-right corner to add a new desktop.
2. Switch between desktops: Use the Mission Control key or swipe left or right with three or four fingers on the trackpad to switch between desktops.
3. Move windows between desktops: Enter Mission Control, drag and drop the window onto the desired desktop, or right-click on the window and choose "Move to" followed by the target desktop.
Linux (GNOME desktop environment):
1. Create a new desktop: Press Super key (Windows key) + Ctrl + D.
2. Switch between desktops: Press Super key + Tab to open the Overview mode and click on the desired desktop, or use the shortcut Super key + Ctrl + Left Arrow/Right Arrow.
3. Move windows between desktops: Open Overview mode, drag and drop the window onto the desired desktop, or right-click on the window title bar and choose "Move to Another Workspace."
These are general instructions, and the specific steps may vary slightly depending on the version and customization of your operating system. Using multiple desktops can help you stay organized and boost productivity by separating different tasks or projects into distinct workspaces.
4. Task Manager (Windows) or Activity Monitor (Mac): Use these utilities to monitor and manage running processes, applications, and system performance. They can help you identify and close any resource-hogging programs.
The Task Manager is a built-in system monitoring and management utility in Windows operating systems. It provides detailed information about running processes, resource usage, and system performance.Additionally, it allows you to manage running applications, end unresponsive processes, and monitor system performance in real-time.
Here's how to open and use the Task Manager in Windows:
1. Open Task Manager: There are several ways to open the Task Manager:
2. Task Manager Tabs:
3. Ending Processes:
4. Additional Task Manager Functions:
1. Open Task Manager: There are several ways to open the Task Manager:
- Press Ctrl + Shift + Esc.
- Right-click on the taskbar and select "Task Manager" from the context menu.
- Press Ctrl + Alt + Del and choose "Task Manager" from the options menu.
- Processes: Displays a list of running processes, their resource usage, and allows you to end or manage them.
- Performance: Provides real-time graphs and information about CPU, memory, disk, and network usage.
- App History: Shows resource usage statistics for installed apps.
- Startup: Lists the programs that launch automatically when you start your computer and allows you to enable or disable them.
- Users: Displays the users currently logged into the system.
- Details (Windows 8 and later): Provides more detailed information about running processes and allows you to manage them.
- Services (Windows 8 and later): Shows the system services running on your computer and allows you to start, stop, or modify them.
- More details (Windows 10 and later): Expands the Task Manager window to show additional details and options.
- In the "Processes" or "Details" tab, select the process you want to end and click on the "End Task" button.
- Right-click on a process and select "End Task" or "End Process."
- To monitor CPU, memory, disk, and network usage in real-time, switch to the "Performance" tab.
- To view the applications running on your computer, switch to the "Applications" or "Processes" tab.
- To manage startup programs, switch to the "Startup" tab and enable or disable programs as needed.
- To restart or shut down your computer, click on the "File" menu and select the desired option.
The Task Manager is a powerful tool for managing processes, monitoring system performance, and troubleshooting issues on your Windows computer.
Its features and layout may vary slightly depending on the version of Windows you are using, but the general functionality remains the same.
1. Create Folders: Start by creating a folder structure that makes sense for your needs. Group related files together in folders to keep everything organized. For example, you might have folders for work projects, personal documents, photos, or specific hobbies.
2. Use Descriptive Names: Give your files and folders meaningful names that reflect their content. Avoid generic names like "Document1" or "New Project." Instead, use specific names that describe the file's purpose or content. For example, "Quarterly_Report_Q3_2023.docx" is much more descriptive than "Report.docx."
3. Consistent Naming Convention: Establish a consistent naming convention to make it easier to sort and search for files. You might use dates, project codes, or a combination of keywords that make sense for your files. Consistency is key to quickly finding the files you need.
4. Use Subfolders: If a folder becomes too large or complex, create subfolders to further organize the content. For example, within a "Work Projects" folder, you might have subfolders for each specific project.
5. Date-Based Organization: If appropriate, include dates in your file names to facilitate chronological organization. This is particularly helpful for files that have versions or need to be archived.
6. Keep it Simple: Avoid creating too many nested folders or using overly complex naming conventions. Strive for simplicity and readability to ensure the system is user-friendly.
7. Regular Maintenance: Periodically review and clean up your files and folders. Delete unnecessary files and reorganize as needed. This practice prevents clutter from building up and ensures your organization remains effective over time.
8. Backup and Sync: Consider using cloud storage services or external hard drives to back up your organized files. This way, you can access them from anywhere and have a secure backup in case of hardware failure.
By following these file organization principles, you can save time and reduce frustration when searching for important files. It also helps you maintain a tidy digital workspace and fosters better productivity in the long run.
5. Quick calculations: Use the search bar or address bar of your browser as a calculator. Simply type in an arithmetic expression, and the browser will display the result.
Using the search bar or address bar of your web browser as a calculator is a convenient way to perform quick calculations without needing a separate calculator app. Most modern browsers support this functionality.
Here's how you can do it:
1. Open your web browser (Google Chrome, Firefox, Edge, Safari, etc.).
2. In the search bar or address bar (also known as the omnibox), simply type in the arithmetic expression you want to calculate. For example:
- Type "2 + 2" and press Enter to get the result "4".
- Type "sqrt(25)" and press Enter to get the result "5" (square root of 25).
- The browser will automatically calculate the expression and display the result in the search bar or address bar.
You can perform more complex calculations using standard arithmetic operators like addition (+), subtraction (-), multiplication (*), division (/), and more.
You can also use parentheses to group operations and functions like square root (sqrt), trigonometric functions, and logarithms.
It's a quick and handy way to do simple calculations without leaving your browser or opening a separate calculator app.
However, for more advanced or scientific calculations, you may still need to use a dedicated calculator or a specialized tool.
6. File organization: Keep your files organized by creating folders and using descriptive names. Use a consistent naming convention to make it easier to find and manage your files.
File organization is essential for maintaining a clutter-free and efficient digital workspace. By following a few simple guidelines, you can keep your files well-organized and easily accessible:1. Create Folders: Start by creating a folder structure that makes sense for your needs. Group related files together in folders to keep everything organized. For example, you might have folders for work projects, personal documents, photos, or specific hobbies.
2. Use Descriptive Names: Give your files and folders meaningful names that reflect their content. Avoid generic names like "Document1" or "New Project." Instead, use specific names that describe the file's purpose or content. For example, "Quarterly_Report_Q3_2023.docx" is much more descriptive than "Report.docx."
3. Consistent Naming Convention: Establish a consistent naming convention to make it easier to sort and search for files. You might use dates, project codes, or a combination of keywords that make sense for your files. Consistency is key to quickly finding the files you need.
4. Use Subfolders: If a folder becomes too large or complex, create subfolders to further organize the content. For example, within a "Work Projects" folder, you might have subfolders for each specific project.
5. Date-Based Organization: If appropriate, include dates in your file names to facilitate chronological organization. This is particularly helpful for files that have versions or need to be archived.
6. Keep it Simple: Avoid creating too many nested folders or using overly complex naming conventions. Strive for simplicity and readability to ensure the system is user-friendly.
7. Regular Maintenance: Periodically review and clean up your files and folders. Delete unnecessary files and reorganize as needed. This practice prevents clutter from building up and ensures your organization remains effective over time.
8. Backup and Sync: Consider using cloud storage services or external hard drives to back up your organized files. This way, you can access them from anywhere and have a secure backup in case of hardware failure.
By following these file organization principles, you can save time and reduce frustration when searching for important files. It also helps you maintain a tidy digital workspace and fosters better productivity in the long run.
Conclusion
In conclusion, learning computer hacks and tricks for maximum efficiency is like unlocking the full potential of your computer.By applying these clever techniques, you can save time, simplify tasks, and work smarter in both personal and professional settings.
From keyboard shortcuts to file organization and system customization, these tricks empower you to make the most of your digital tools. Embrace these hacks, and you'll experience a more productive and enjoyable computing experience. Happy hacking!


Catat Ulasan